Video
Ingredients:
- Fondant Gum paste mix (Blue, Red, Yellow, Green, White, and Black)
- Fondant (White)
- Gum paste glue
- Cake (9*13) Flavor of your choice
- Vanilla Icing
Additional Tools:

- Cake Board (Round 8 inches and Rectangular 9*13 inches)
- Boarder Press
- Wilton Fondant Gum Paste Molds (Baroque and Global)
- Wilton Fondant Ribbon Cutter and Embossing Roller
- Wilton Fondant and Gum Paste Cut N Spin Board
- Wilton Wave Flower Former
- Rolling Pin
- Practice Board
- Thick and Thin Foam
- Wooden Dowel
- Toothpick
- Paint Brush
- Paint Dish
- Gold Petal Dust
- Vanilla Extract
- Floral Wire (White)
- Lily Floral Stamen
- Round Cutter, large
- Leaf Cutter, medium
- Petal Cutter, large, medium and small
- Tip 104, 5
- Parchment Paper, Facial Tissue, Vegetable Shortening
Cake Design Size:
- Spout: 4 ½ inches long (approx.)
- Handle: 4 inches long (approx.)
- Side of the Cake: White Fondant 4 ½ inches Height and 12 inches long (approx.)
- Top: 3 ½ inches wide (approx.)
- Total Height of the cake: 6 inches tall (approx.)
Download Peacock Teapot Cake Design PDF
Directions:
Cake Board:
Step 1: Draw your Peacock Teapot design on the cake board using coffee mug for directions.
Step 2: Design the spout, handle and top as a guide.
Step 3: Tape parchment paper and dust the surface using dusting pouch.
Spout and Handle:
Step 1: Apply vegetable shortening on your hands to avoid sticking.
Step 2: Knead blue fondant until smooth and pliable, and roll it into a ball. Make a log shape on the board to shape the head and body into a spout shape using your fingers. Flatten the bottom edge with your fingers.
Step 3: Place the spout on the cake board to make sure of the size and design. Smooth the top. Insert toothpicks in the spout, one on top and two at the bottom.
Step 4: Cut three stamens out of the lily stamen. Dip them in the glue and insert on top of the head.
Step 5: To design handle, follow the same step as spout. Cut excess fondant while measuring the size and shape with the diagram on the cake board.
Step 6: Transfer the handle on the cake board and insert one toothpick on top and bottom.
Beak, Eyes, and Feathers:
Step 1: Roll out white fondant on the board and cut four medium leaf shapes. Transfer the shapes on dusted thin foam and thin the edges using the ball tool.
Step 2: Using the toothpick slowly roll along the bottom edge for added texture. To add petal patterns on the body feathers use tip 104. Repeat with remaining cut-outs.
Step 3: Using small amount of black fondant knead into a ball. Elongate with a slant to shape into eyes. Note: Remember to make them opposite shape with a slant at the edge.
 Step 4: Using tip 5 cut out two small white fondant balls for the eye center. Attach them using the glue and toothpick into place.
Step 5: Attach the body feathers overlapping slightly using the glue on the bottom of the spout. Insert facial tissue for added support.
Step 6: Store 2 feathers and an eye on the practice board, for later use. Attach the eye using gum paste glue on the head.
Step 7: Using white fondant make beak between your fingers. Insert a small piece of toothpick to attach on the head. Insert tissue under the beak for support until dry.
Feathers:
Step 1: Roll green fondant about 1/8th inch thick and cut 10 medium leaf shapes for feathers.
Step 2: Dust thick and thin foam, and thin the edges of leaf cut out on the thin foam using large end of the ball tool. Place the cut-out on thick foam and cup the center by dragging the tool from the bottom to center.
Step 3: Dip the floral wire in the glue and insert into the leaf cut-out before placing it to dry on dusted flower former. Repeat with the rest of the cut-outs and place them at different angle for different cupped or arched shapes when dry.
Step 4: Roll red fondant about 1/8th inch thick and cut out 10 large petal shapes. Transfer them on dusted thick foam and thin the edges and cup the center. Place them to dry on the practice board.
Step 5: Roll yellow fondant about 1/8th inch thick and cut out 10 large petal shapes. Transfer them on dusted thick foam and thin the edges and cup the center. Place them to dry on the practice board.
Note: Keep in mind to leave them a bit smaller than red cut-outs.
Step 6: Roll blue fondant about 1/8th inch thick and cut out 10 medium petal shapes. Transfer them on dusted thick foam and thin the edges and cup the center. Place them to dry on the practice board.
Step 7: Roll white fondant about 1/8th inch thick and cut out 10 small petal shapes. Transfer them on dusted thick foam and thin the edges and cup the center. Place them to dry on the practice board.
Step 8: Roll black fondant about 1/8th inch thick and cut out 10 shapes using tip 104. Place them to dry on the practice board.
Step 9: Place all the red petal shapes on the board and apply glue to stick yellow, blue, white and black cut-outs on top of each other.
Step 10: Attach the feather center to the large green leaf cutter on the flower former using the glue.
Design Appliques:
 Step 1: Dust the Wilton Fondant Gum Paste Molds (Baroque and Global) with dusting pouc
h. Insert white fondant and pressing into the molds for detailed patterns. Make at least two of each design of your choice.
Step 2: Place all the appliques on the board. Paint appliques with gold petal dust mix with clear vanilla extract. Let if air dry.
Reminder: Paint the feather edges, body feathers, beak, eye and all the white appliques with gold petal dust.
Cake Body:
 Step 1: Cut out five large round cut-outs of the cake and place the center piece on side. Cut off all the dark layer of the cake from top and level it according to preference. One side piece is extra in case one piece falls apart.
Note: Keep in mind that the cake is fresh and is not refrigerated before shaping into desire shape. I am particularly looking for a tilt and slanting look, the design suits my modern teapot.
Step 2: Take the center tallest piece before trimming the sides to make a slanting shaped on all side to form the top of the cake.
Step 3: Apply a thin coat of icing on the cake board and place the cake in the center. Add icing for leveling and spread with spatula. Place another two cake layers with icing in between to form layers.
Step 4: Place the cake top as the top layer. Insert two dowels in the center, this will hold the cake in position while icing. Ice the cake with additional icing and smooth icing with spatula.
Note: Ice according to your preference as crumb coat first and then final coat on top or just crumb coat for diabetic as shown in video.
Step 5: Place the cake for 20 minutes in the refrigerator to crust. Smooth the sides with Viva towel.
Covering the Cake with Fondant:
Step 1: Roll out white fondant about 1/8th inch thick and using the large round cutter cut-out one piece for the top of the cake.
Step 2: Roll out white fondant for the sides about 1/8th inch thick and 12 long. Using the Ribbon Cutter cut-out about 4 ½ inches wide strip. Gently lift and wrap it around the cake.
Note: Icing is moist avoiding the use of piping gel to stick the fondant in place on the cake. If using icing that crust easily, please use piping gel to avoid the fondant fall off the cake.
Step 3: Once the fondant is in place, frill the top of the fondant to add texture. Use cake smoother dusted with dusting pouch smooth the sides of the cake.
Note: There is a seam at the back, try to smooth as much as possible, minor imperfections will be covered with appliques and feathers.
Step 4: Roll out white fondant about 1/8th inch thick and using the Ribbon Cutter cut-out about 10 inches long strip and 1 inch wide. Use the boarder cutter to add design on it, by pressing firmly.
Step 5: Gently lift and wrap it around the top. Cut excess off and gently press it into place, so all the cake is covered.
Final Assembly:
Step 1: Insert the spout in place on the longest side of the cake, with seam on the back side. Insert the toothpicks in place on the side of the cake gently to avoid any cracks on the spout.
Step 2: Insert the handle on the shortest side of the cake gently to avoid any cracks on the handle.
Note: The handle and the spout are going to add additional support for the cake for the slanting look of modern teapot.
Step 3: Attach the appliques by applying gum paste glue. The largest piece goes first to help guide the small pieces on both sides of the teapot.
Note: Pick applique designs with as opposite sides are reversed, learn from experience as you go along.
Step 4: Attach the feathers and eye on the spout in place. Add appliques on the top and handle.
Step 5: Cut excess the floral wire off, insert them inside the large applique on the body of the teapot. Three feathers are long and two are shorter that fit between the long feathers. Attach each feather with glue and hold it in place for few minutes.
Step 6: Attach two appliques on the back of the head to make a halo effect.
Step 7: Repeat decorating on the back of the peacock teapot.
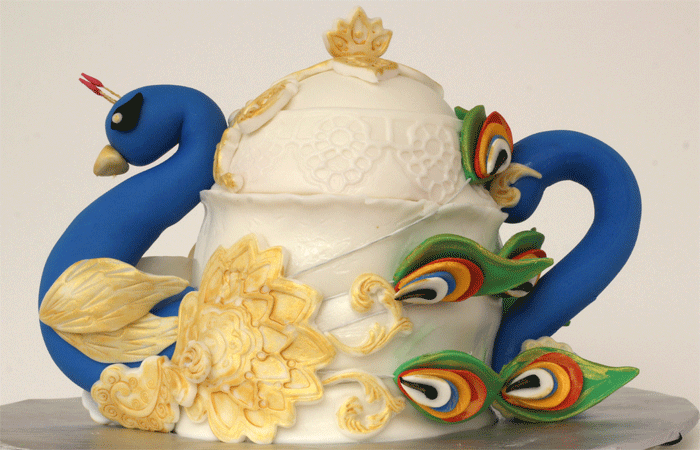
Your beautiful Peacock Teapot Cake with a modern look is ready to enjoy for any birthday or dazzle your guest at any party. This cake is for my sister’s birthday, specially designed for her.
Hope you enjoy this lovely cake with your friends and family!