Ingredients:
- Strawberry Cake 9*13 inches
- Strawberry Icing
- Satin Ice Fondant (White, Pink and Red)
- Sugar Pearls (White and Gold)
- Pearl Dust (Pink)
- Gold Dust
- Vanilla Flavoring
- Sugar Water (Pink)
- Water
- White Vegetable Shortening
- Rolling Pin
- Dusting Pouch
- Cutting Board
Tools:
- Cake Boss (4 piece Imprint Mat Set) (Amazon)
- Cake Board and Wilton Cut-N-Spin Rotating Board
- Spatula and Wilton Small Rolling Tool
- Bread Knife
- Cardboards (Headboard and Footboard)
- Cutters Rose Flower and Heart (Medium)
- Wilton Scallop Ruffle Cutter
- Paint Brushes
- Wilton Fondant & Gum Paste Dimensional Baroque Mould
- Silicone European Relief Lace Fondant Embossed Mold Cake Pastry Decorating Mould (eBay)
- Silicone Fondant Cake Lace Sugar Craft DIY Mat Texture Flower Decorating Mold (eBay)
Dimensions:
- Bed Size:8 ½ inches Length; 6 ¾ inches Width; 2 ½ inches Height
- Headboard Size: 5 ¾ inches Width and 7 inches Height
- Footboard Size: 4 1/8th inches Width and 7 inches Height
Instructions:
Step 1: Place strawberry cake on the cutting board and trim the edges on all sides with a bread knife. Cut the cake into half.
Step 2: Apply a thin coat of icing on the cake board and place the cake on the board.
Step 3: Gently pour sugar water on the cake to keep it moist. Apply a thin coat of icing; place the other half of the cake on top to layer the cake.
Step 4: Gently pour sugar water on the cake to keep it moist. Ice the cake with pink strawberry icing.
Final Assembly:
Step 1: Roll white fondant on Wilton rotating board and place headboard cardboard on top half. Fold the fondant to cover the top of the cardboard entirely. Gently press it into place and seal the edges while the fondant is moist and pliable, use water as needed to seal the edges.
Step 2: Cut the excess fondant with the spatula. Gently press the edges with fingers and thumb to keep the headboard shape. Dust the headboard with dusting pouch. Use the imprint mat to add small quilt pattern on top. Repeat Step 5 and 6 for foot board of the Barbie Bed cake.
Step 3: Dust the Wilton Fondant & Gum Paste Dimensional Baroque Mould and Silicone European Relief Lace Fondant Embossed Mold Cake Pastry Decorating Mould with dusting pouch. Press fondant to make desired patterns (2 each) for the head and footboard.
Step 4: Attach the patterns in place to the head and foot board with a brush of water.
Step 5: Apply a thin coat of water to the bottom half of the headboard and attach it to one end of the cake. Apply pressure to attach gently in place.
Step 6: Apply a thin coat of water to the back half of the foot board and attach it to the other end of the cake. Keep the designs and patterns on the outside for the footboard, as shown in the video.
Step 7: Roll white fondant into 1/8th inch thick and make 4 cut-outs with Wilton Scallop Ruffle Cutter for border.
Step 8: Attach the cut-outs on the bottom edge of the cake with ¼ cut-outs flowing out on the bottom. Remove the excess border and place small pieces of facial tissue to give a wavy look.
Step 9: Roll pink fondant 1/8th inch thick and cut a rectangle shape for the top of the cake. Dust the top with dusting pouch and make imprint of small quilt pattern on the pink fondant.
Step 10: Pick up the pink fondant and place it directly on top to the cake. Apply gentle pressure to attach in place as desired.
Step 11: Apply a dot of water on each corner of the quilt pattern and alternate attaching gold and white pearls to the quilt on the cake. One row of white and one row of gold pearls pattern would emerge in the end.
Step 12: Roll pink fondant about 1/8th inch thick and dust the Silicone Fondant Cake Lace Sugar Craft DIY Mat Texture Flower Decorating Mold with dusting pouch. Place the fondant on top and gently roll with the rolling pin to get the impression from the lace mold.
Step 13: Remove the fondant from the lace mold and cut the edges with a small rolling tool. Cut with the half of the cutter on the fondant using medium rose flower cutter to get scallop look.
Step 14: Repeat Steps 12 and 13 to make total of 4 cut-outs. Attach to the side of the quilt with a thin coat of water to complete the blanket, remove excess fondant with a spatula. Place small pieces of facial tissue to add a wavy look at the bottom.
Step 15: Brush the quilt and the patterned sides with dry pink pearl dust to add a little sparkle and shine to the fondant.
Step 16: Mix gold dust with vanilla flavoring to paint the patterns and the edges on the head and footboard.
Step 17: Remove the facial tissues after 8 hours.
Pillows:
Step 1: Roll pink fondant 1/8th inch thick and make two heart cut-outs to make pillows. Attach small heart patterns with water to the cut-outs.
Step 2: Roll red fondant and cut into 1/4th inch wide strips about 2 inches long. Roll one end while shaping it into a ribbon rose, make 3 roses.
Step3: Paint the top of the pillows with gold dust.
Step 4: Place the pillows on the headboard side of the cake for finishing touch.
Helpful Hint:
- The head and foot board have sharp edges which causes tear in the fondant. I find that Satin Ice Fondant is great if you apply small pieces to the torn area and gently brush with wet paint brush; it smooth’s out the surface and evenly blends without showing the tear.
- If you have a lace pattern or border cutter which are longer helps without having to place two cut-outs on one side.
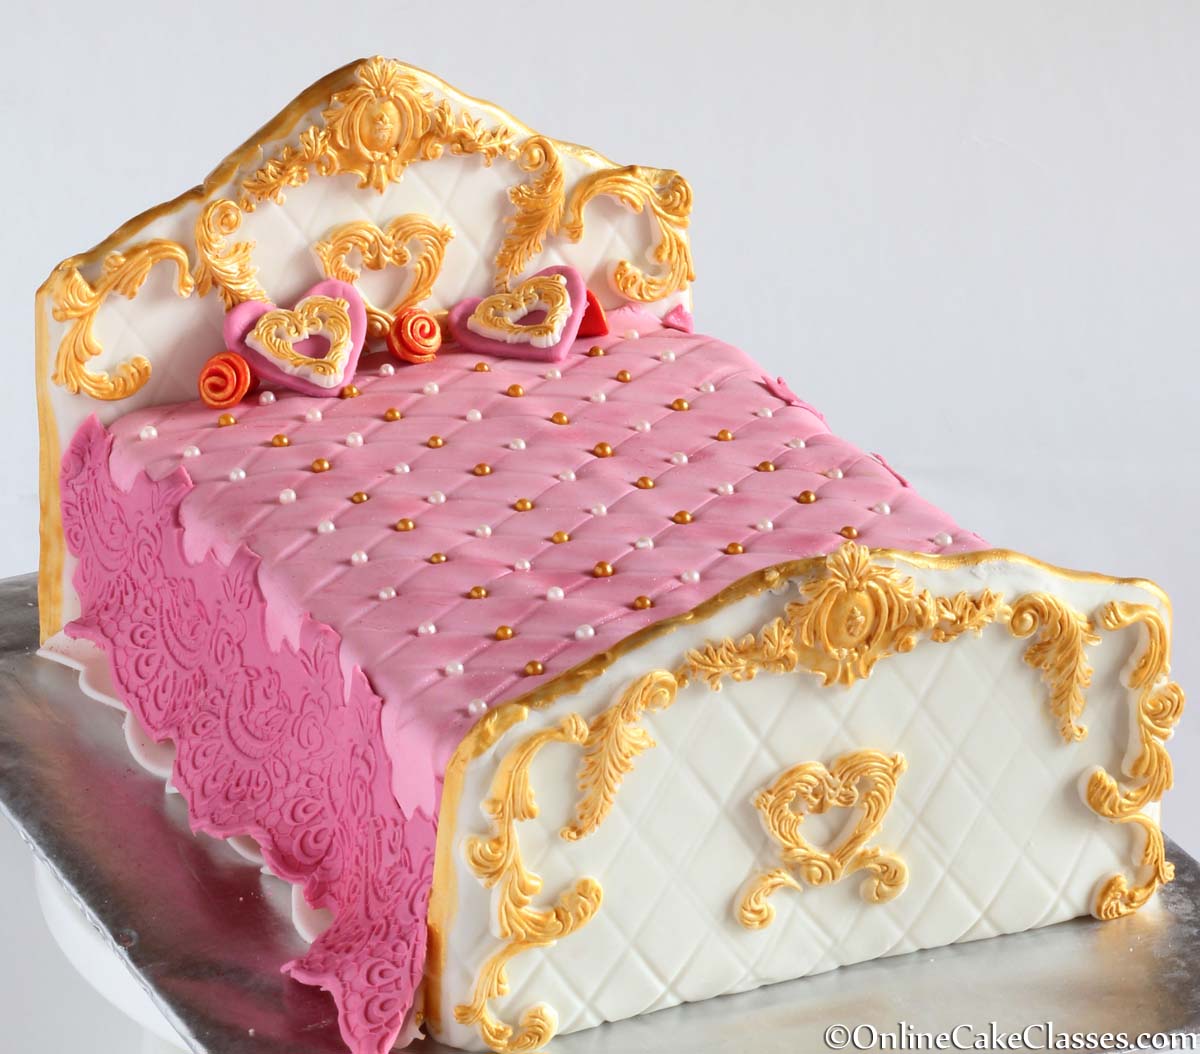
- This is my version of a Barbie Bed Cake; if you have new ideas feel free to apply your imagination and creative side to make your own personalized Barbie Bed Cake. Present the cake as you see fit as Barbie is the most beloved doll for many generations.
- Pink Cake for the pink loving girls !!!!